Prerequisites
-
Access to the Quote Dashboard.
-
Appropriate permissions to view and edit client communications.
-
Client contact information available in the system.
Overview
This article explains how to manage quote-related communications with your clients using the Quote Communication feature in the Quote Dashboard. Users can review past interactions, add new communications, and set reminders for follow-ups—all tied directly to a specific quote.
Estimated Time to Complete: 5–10 minutes
Skill Level: Beginner to Intermediate
Step-by-Step Instructions
1. Open Quote Communication Panel
-
Navigate to the Quote Dashboard.
-
Locate the quote you're working with.
-
Click the envelope icon in the "Actions" column to view all communications related to this quote.

2. Review Existing Communications
-
The Quote Communication List modal displays a table of previous communications.
-
Each entry includes the date, type (Email, Phone, On Site), from, to, and whether a follow-up is required.
-
To edit an existing communication, click the pencil icon.
-
To delete, click the red X icon.
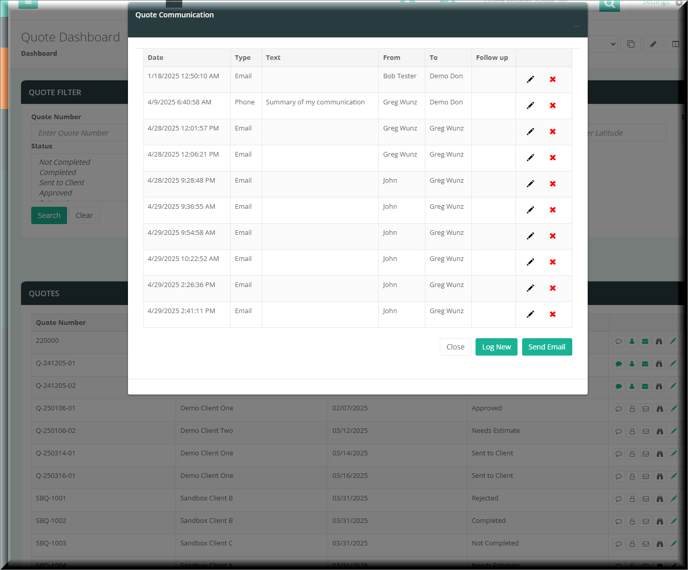
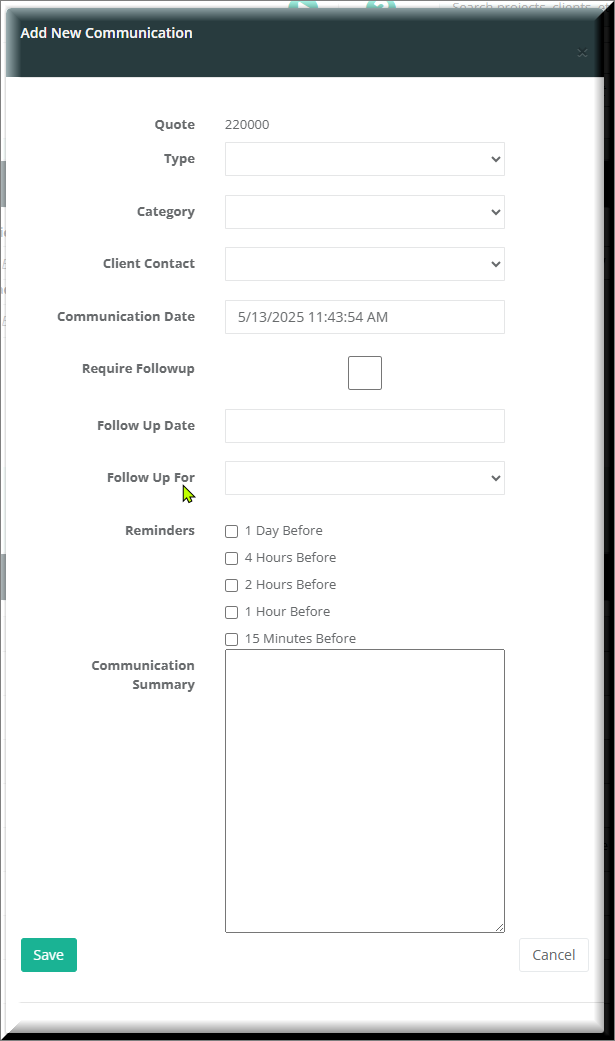
3. Log a New Communication
-
Click the Log New button to open the New Communication modal.
-
Fill out the communication details:
-
Type: Choose Email, Phone, or On Site.
-
Category: Select a category (managed by admins in Settings).
-
Client Contact: Choose the person you communicated with. Optionally, add a new contact.
-
Communication Date: Set the date and time of the communication.
-
4. Set Follow-Up Details (Optional)
-
Require Followup: Check this box if a follow-up is needed.
-
Follow Up Date: Choose the due date for follow-up.
-
Follow Up For: Assign the follow-up to a specific user.
-
Reminders: Select from available options (e.g., 15 minutes, 1 hour, 1 day before).
Tip: Use reminders to ensure timely responses to client needs.
-
Follow Up Completed Date / By: Log completion details when the follow-up is done.
5. Add Communication Summary
-
Use the Communication Summary field to enter notes from the conversation.
-
Be concise and include key details such as decisions made, client concerns, or next steps.
6. Save or Send Email
-
Click Save to log the communication.
-
Use Cancel to discard the entry.
Notes & Tips
Note: Categories available in the dropdown are managed by administrators in the system settings.
Tip: Always use the Follow-Up feature when an action is expected after the conversation. It improves accountability and client satisfaction.